
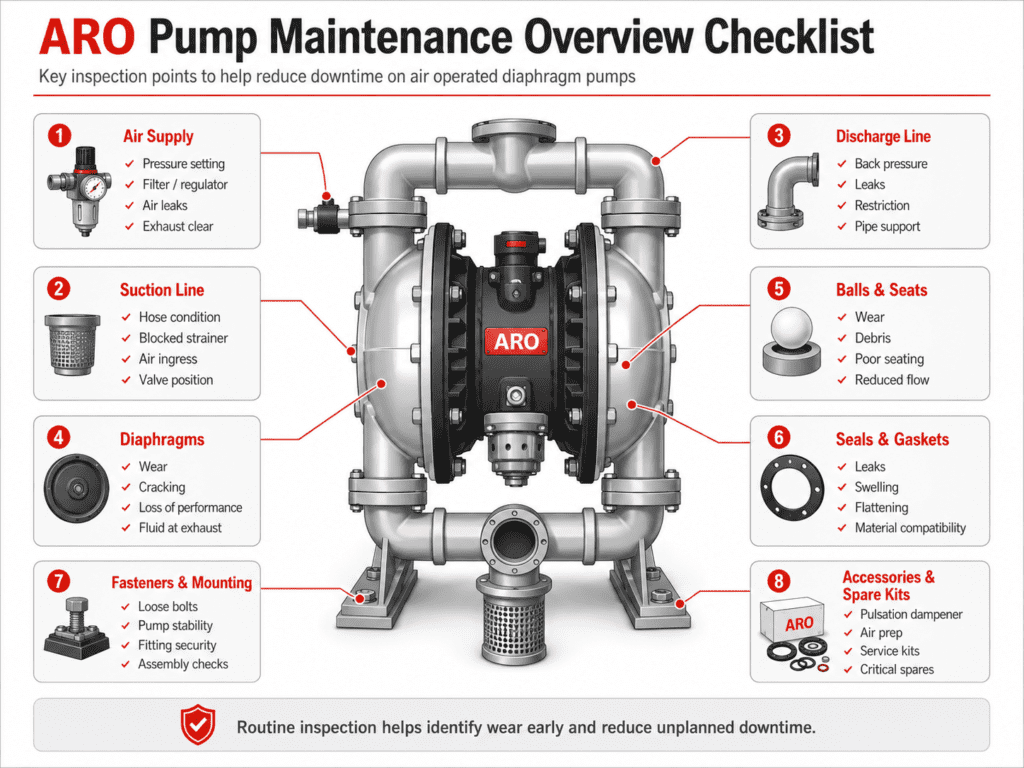
ARO Pump Maintenance Checklist: How to Reduce Downtime
This ARO pump maintenance checklist explains the routine checks that can help reduce downtime, extend service life and keep air operated diaphragm pumps working reliably. ARO diaphragm pumps are widely used across industrial fluid transfer applications, but like any process equipment, they need regular inspection and planned maintenance to prevent avoidable failures.
Many AODD pump problems start small. A slight air leak, worn diaphragm, damaged valve ball, blocked suction line or loose fitting can gradually reduce performance before the pump stops completely. A simple maintenance routine helps identify these issues early, before they become production downtime.
This guide covers the key checks to include in an ARO pump maintenance schedule, including visual inspection, air supply checks, suction and discharge checks, diaphragm condition, valve balls, seats, seals, fasteners, accessories and spare parts planning.
Why ARO Pump Maintenance Matters
ARO air operated double diaphragm pumps are commonly used because they are robust, versatile and suitable for many fluid transfer duties. However, pump performance still depends on the condition of the air supply, fluid path, diaphragms, valve components and installation.
Poor maintenance can lead to:
- Reduced flow rate
- Loss of pressure
- Increased air consumption
- Irregular or stalled pump operation
- Product leakage
- Air leaks
- Diaphragm failure
- Damaged balls, seats or seals
- Increased wear on wetted components
- Unplanned downtime
A planned maintenance approach helps operators spot early warning signs, order the right parts in advance and schedule repairs before the pump fails during production.
How Often Should an ARO Pump Be Checked?
There is no single maintenance interval that suits every pump. The right inspection frequency depends on the fluid, duty cycle, operating pressure, site conditions and how critical the pump is to production.
A pump transferring clean, low-viscosity fluid occasionally may need less frequent servicing than a pump handling abrasive slurry, aggressive chemicals or high-cycle production duty.
As a general approach:
- Check critical pumps daily or before each shift
- Inspect regularly used pumps weekly
- Review higher-duty pumps monthly
- Schedule deeper inspections based on operating hours, cycles or known wear patterns
- Keep maintenance records so wear trends can be identified
The most important point is consistency. A short routine check carried out regularly is usually more useful than waiting until the pump has already lost performance.
Daily or Pre-Use ARO Pump Checks
Daily checks should be quick, simple and focused on obvious warning signs. These checks help confirm the pump is safe to run and has no visible issues before operation.
Before starting the pump, check:
- Is the pump securely mounted?
- Are there visible leaks around manifolds, fluid caps or fittings?
- Are air lines connected correctly and in good condition?
- Are suction and discharge hoses or pipework supported?
- Are isolation valves open where required?
- Is the suction line free from obvious blockage or collapse?
- Is the air pressure set correctly?
- Is the exhaust clear and not restricted?
- Are there unusual signs of wear, vibration or movement?
- Is the area around the pump clean and safe to access?
During operation, listen for changes in pump rhythm. AODD pumps usually have a recognisable operating sound. A sudden change in cycling speed, uneven rhythm or excessive air noise can indicate a problem.
Weekly ARO Pump Maintenance Checks
Weekly checks should go slightly deeper than the daily inspection. The aim is to identify developing issues before they affect performance.
Check the following:
- Air filter/regulator condition
- Air line leaks
- Correct air pressure setting
- Condition of suction hose or pipework
- Condition of discharge hose or pipework
- Signs of fluid leakage
- Loose fasteners or fittings
- Pump mounting bolts
- Pulsation dampener condition, where fitted
- Unusual noise or excessive vibration
- Product build-up around the pump
- Evidence of chemical attack or corrosion
- Exhaust condition
If the pump is installed in a wet, corrosive, dusty or washdown environment, external condition should be checked carefully. Build-up around the pump can hide leaks, corrosion or loose fittings.
Monthly or Planned Maintenance Checks
Monthly checks should focus on wear, performance trends and service planning. These checks are useful for pumps that run regularly or are important to production.
A monthly inspection may include:
- Checking pump output against expected flow
- Reviewing air consumption or cycling behaviour
- Inspecting diaphragms if duty conditions justify it
- Checking valve balls and seats for wear
- Inspecting O-rings, gaskets and manifold seals
- Checking manifold fasteners
- Inspecting air valve performance
- Reviewing service history
- Confirming spare kits are available
- Checking whether the duty has changed since the pump was installed
If the pump is becoming slower, noisier or less efficient, do not only increase the air pressure to compensate. Reduced performance is often a symptom of wear, suction restriction, air supply issues or valve problems.
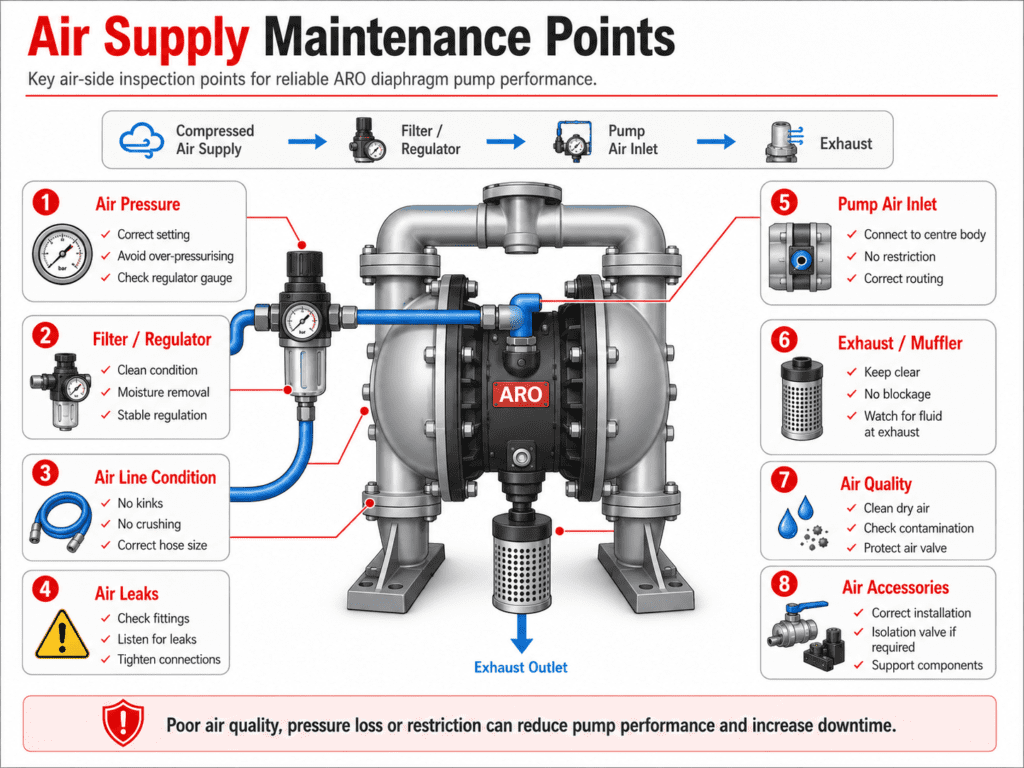
Check the Air Supply
The air supply is one of the most important parts of ARO pump reliability. Poor air quality, incorrect pressure, moisture, contamination or restriction can all affect pump performance.
Check that:
- The air pressure is within the recommended range for the pump
- The air line is correctly sized
- The air supply is clean and dry
- The filter/regulator is working correctly
- The air line is not kinked, crushed or restricted
- The exhaust is not blocked
- There are no audible air leaks
- The pump is not being starved of air
- Air accessories are installed in the correct position
A pump that cycles slowly, stalls or performs inconsistently may not have a fluid-side fault. It may be caused by poor air supply, restricted air flow or contamination in the air system.
For best results, air preparation equipment should be checked as part of the pump maintenance routine, not treated as a separate issue.
Check the Suction Side
Many pump performance issues begin on the suction side. If the pump cannot draw fluid properly, it may run slowly, lose prime, cycle unevenly or fail to deliver the expected flow.
Check the suction side for:
- Blocked strainers
- Collapsed suction hose
- Air leaks on suction connections
- Excessive suction lift
- Closed or partially closed valves
- Undersized suction pipework
- Product build-up
- Solid blockage
- Incorrect hose type
- Excessive pipework restriction
Suction leaks can be difficult to see because they may draw air into the line without leaking fluid out. If the pump is losing prime or passing air with the fluid, suction-side connections should be checked carefully.
Avoid using the pump to overcome poor suction pipework design. Correct suction conditions are essential for reliable AODD pump operation.
Check the Discharge Side
The discharge side should be checked for restriction, pressure build-up and secure pipework. A blocked or restricted discharge line can reduce flow and increase stress on the pump.
Check the discharge side for:
- Closed or partially closed valves
- Blocked pipework
- Blocked nozzles or filters
- Excessive back pressure
- Damaged hose
- Unsupported pipework
- Leaking joints
- Incorrect pipe size
- Faulty pulsation dampener, where fitted
If the pump is running but flow is low, the issue may be caused by discharge restriction rather than the pump itself.
Where pulsation dampeners, counters, control valves or other accessories are fitted, they should be included in the maintenance check.
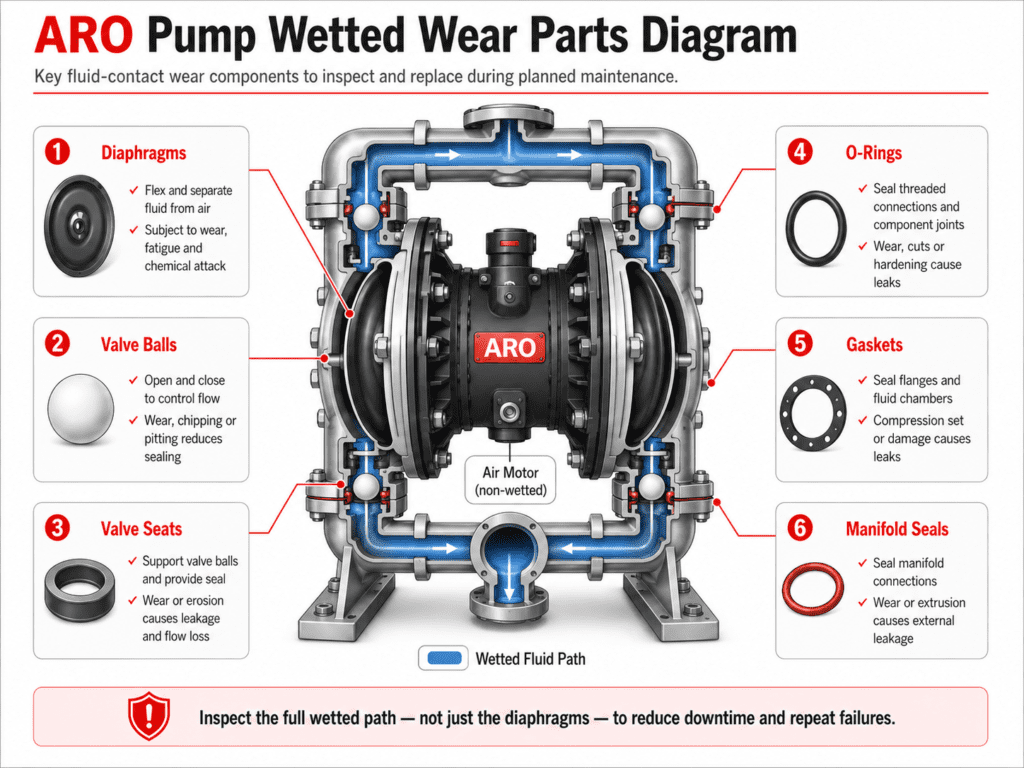
Inspect Diaphragms
Diaphragms are critical wear components in an AODD pump. They flex during operation and are exposed to the pumped fluid, pressure changes and cycle fatigue.
Signs of diaphragm wear or failure can include:
- Fluid leaking from the exhaust
- Reduced flow
- Uneven pump cycling
- Loss of prime
- Air in the fluid stream
- Pump stalling
- Product leakage
- Unusual operating noise
The correct diaphragm material depends on the fluid, temperature and application. A diaphragm that is not compatible with the fluid may swell, crack, stiffen or fail prematurely.
When replacing diaphragms, always check the pump model, material specification and service kit requirements before ordering parts.
Inspect Valve Balls and Seats
Valve balls and seats control the flow of fluid through the pump. If they become worn, damaged, swollen or blocked, the pump may lose efficiency or fail to prime properly.
Check valve balls and seats for:
- Wear marks
- Swelling
- Cuts or damage
- Chemical attack
- Debris
- Incorrect seating
- Loss of shape
- Abrasive wear
Common symptoms of worn balls or seats include reduced flow, poor suction lift, inconsistent cycling and fluid slipping back through the pump.
For fluids containing solids, abrasives or crystals, valve components may need more frequent inspection.
Inspect O-Rings, Gaskets and Seals
O-rings, gaskets and seals help keep the pump leak-free. Over time, they can become flattened, swollen, brittle or chemically damaged.
Check sealing components for:
- Leaks around manifolds
- Cracked or flattened seals
- Swollen elastomers
- Chemical attack
- Incorrect material compatibility
- Damage after disassembly
- Seals not seated correctly
Never assume that a seal is suitable just because the pump body material is compatible. Seals are also wetted parts and should be checked against the fluid and operating conditions.
Check Fasteners and Pump Assembly
Pump fasteners can loosen over time due to vibration, pressure cycling, temperature changes or maintenance work. Loose fasteners may lead to leaks or uneven sealing.
Check:
- Manifold bolts
- Fluid cap bolts
- Mounting bolts
- Air section fasteners
- Hose or pipework connections
- Accessory fittings
Use the correct tightening sequence and torque values from the pump manual when carrying out service work. Over-tightening can damage components, especially on plastic pump bodies.
After any maintenance work, inspect the pump carefully during start-up to confirm there are no leaks or abnormal operating conditions.
Check for Chemical Attack, Corrosion or Wear
External and internal condition should both be considered. A pump may appear to operate normally while materials are gradually being affected by the fluid or environment.
Look for:
- Corrosion
- Cracking
- Discolouration
- Swelling
- Softening
- Surface pitting
- Abrasion
- Product build-up
- Damage around ports or manifolds
Chemical attack can affect pump bodies, diaphragms, balls, seats, seals and accessories. If material damage is visible, the pump specification should be reviewed rather than simply replacing the same parts again.
Keep the Correct ARO Service Kits and Spare Parts
Keeping the right spare parts in stock is one of the simplest ways to reduce downtime. If a pump is critical to production, waiting for parts after failure can be far more expensive than holding a suitable service kit.
Useful spare parts may include:
- Diaphragms
- Valve balls
- Seats
- O-rings
- Gaskets
- Air valve components
- Fluid section kits
- Air section kits
- Complete repair kits
The correct spare kit depends on the pump model, size and material specification. Always confirm the exact pump part number before ordering spares. For manufacturer reference, ARO diaphragm pump repair kits are available for common maintenance tasks involving diaphragms, balls, seats, gaskets and air-section components.
Warning Signs That an ARO Pump Needs Attention
An ARO pump should be inspected if you notice:
- Flow rate has dropped
- Pump is cycling faster than normal
- Pump is cycling slower than normal
- Pump stalls
- Pump loses prime
- Air consumption has increased
- Fluid is leaking externally
- Fluid appears at the exhaust
- Pump rhythm is uneven
- There is excessive vibration
- Product quality has changed
- The pump sounds different during operation
- Maintenance intervals are becoming shorter
These symptoms should not be ignored. They usually indicate that something has changed in the pump, pipework, fluid conditions or air supply.
Common ARO Pump Maintenance Mistakes
One common mistake is increasing air pressure to compensate for poor performance. This may temporarily increase output, but it does not solve the underlying issue and may increase wear.
Another mistake is replacing only the visibly damaged part. If diaphragms, balls, seats or seals have worn together, replacing only one item may lead to repeat maintenance.
It is also common to overlook the suction line. A pump that appears faulty may actually be struggling with a blocked strainer, air leak, collapsed hose or excessive suction lift.
Finally, some users wait until the pump fails before ordering parts. For production-critical pumps, this increases downtime risk and makes maintenance reactive rather than planned.
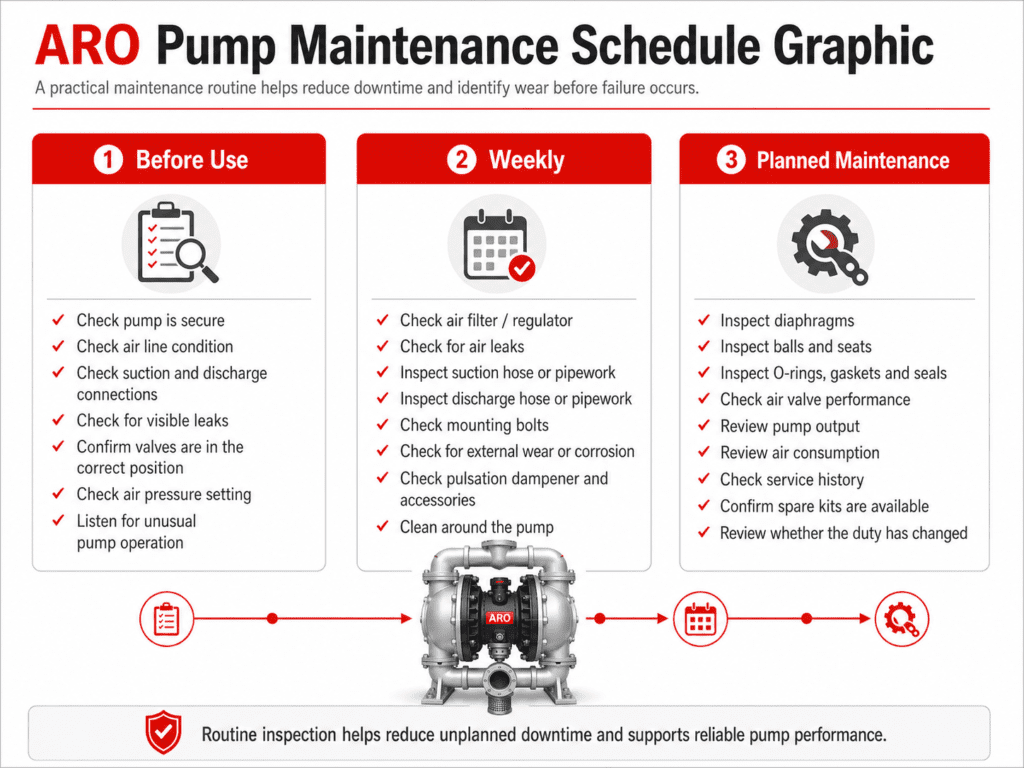
ARO Pump Maintenance Checklist
Use this checklist as a practical starting point:
Before Use
- Check pump is secure
- Check air line condition
- Check suction and discharge connections
- Check for visible leaks
- Confirm valves are in the correct position
- Check air pressure setting
- Listen for unusual pump operation
Weekly
- Check air filter/regulator
- Check for air leaks
- Inspect suction hose or pipework
- Inspect discharge hose or pipework
- Check mounting bolts
- Check for external wear or corrosion
- Check pulsation dampener and accessories
- Clean around the pump
Planned Maintenance
- Inspect diaphragms
- Inspect balls and seats
- Inspect O-rings, gaskets and seals
- Check air valve performance
- Review pump output
- Review air consumption
- Check service history
- Confirm spare kits are available
- Review whether the duty has changed
When to Service or Repair an ARO Pump
A pump should be serviced when routine checks show wear, leakage, performance loss or signs of component damage. It may also be worth servicing the pump before a planned shutdown, seasonal change, production increase or process change.
Servicing may involve:
- Replacing diaphragms
- Replacing valve balls and seats
- Replacing O-rings and gaskets
- Inspecting the air motor
- Cleaning wetted parts
- Checking fasteners
- Testing pump operation
- Reviewing material compatibility
For critical pumps, planned servicing is usually better than waiting for a breakdown. A scheduled service can be timed around production rather than causing unexpected downtime.
Reducing Downtime with Planned Pump Maintenance
Reducing downtime is not only about repairing pumps quickly. It is about spotting wear early, holding the right parts, recording maintenance history and understanding how each pump is used. For wider workplace guidance, HSE’s maintenance of work equipment guidance explains why planned maintenance helps prevent faults, reduce risk and keep equipment working effectively.
Maintenance of work equipment guidance
To reduce downtime:
- Keep a record of pump model and serial details
- Record service dates and parts changed
- Identify critical pumps
- Hold suitable service kits
- Train operators to recognise warning signs
- Check air preparation equipment
- Review suction and discharge pipework
- Investigate repeat failures
- Confirm material compatibility when duties change
If the same pump repeatedly fails, the cause may not be the pump itself. It may be the fluid, installation, air supply, materials, pipework, operating conditions or maintenance approach.
Speak to Aroplus About ARO Pump Maintenance
A planned maintenance routine can help keep ARO pumps working reliably and reduce avoidable downtime. Regular checks of the air supply, suction and discharge lines, diaphragms, balls, seats, seals and accessories can identify small issues before they become costly failures.
Aroplus can support ARO pump servicing, repair, spare parts and service kits. If you are unsure which parts are required, or whether a pump should be repaired or replaced, speak to the Aroplus team for guidance.